Plasma marking is a common industrial process in countless production plants. It serves to many purposes, and it can be made both manually and by means of a mechanized cutting table. In this article we are going to understand better the process and dig deeper into its applications.
What is plasma marking?
Plasma marking is a process that utilizes the intense heat and power of a plasma cutting machine to leave permanent markings on metallic surfaces. It refers to a method of labeling or engraving a design onto a metal or other conductive surface using a plasma torch. It is essentially a modified version of plasma cutting, but instead of severing the metal, it focuses on creating controlled surface alterations.
Main features of plasma marking
- The plasma stream comes from a specialized marking hand or mechanized torch that constrains the plasma flow into a small diameter point for precision marking
- The marks can be made permanent, legible and up to several millimeters deep depending on factors like plasma current, working gas, duration and standoff distance
- It can mark metals like steel, stainless steel, aluminum, titanium and metal alloys efficiently with no tool wear. It also works on other conductive materials like coated metals
Advantages of plasma marking
Compared to other metal marking techniques like stamping or laser engraving, plasma marking offers several advantages.
- Permanence: Plasma markings are highly resistant to wear and tear, making them ideal for long-lasting identification or decorative purposes
- Accuracy and detail: Modern plasma cutters and CNC systems allow for precise control and intricate designs, even on large surfaces
- Efficiency: Plasma marking is often faster and more cost-effective than other methods, especially for large-scale projects
- Versatility: It works on a variety of metals, including steel, aluminum, and stainless steel, making it a flexible option for different applications
How does plasma marking work?
Plasma marking works by using a constricted jet of high energy ionized gas (plasma) to melt or ablate away material from the surface of a conductive workpiece to create a permanent mark. The key to understanding how plasma marking works lies in the precise control of the plasma arc and its interaction with the metal surface. Here’s a more detailed breakdown.
1) Ionization and plasma generation
- Compressed gas (most commonly argon, nitrogen, or oxygen) is injected into the torch head
- An electric arc, generated by high voltage between the torch nozzle and an electrode, heats the gas to extreme temperatures (around 20,000°C)
- The intense heat strips electrons from the gas atoms, turning them into positively charged ions and free electrons, creating a superheated plasma
2) Plasma focus and control
- The magnetic field generated by the arc helps focus the plasma stream into a narrow jet through the nozzle
- Modern plasma cutters utilize advanced circuitry to control the amperage, voltage, and gas flow, allowing precise manipulation of the plasma arc’s heat and intensity
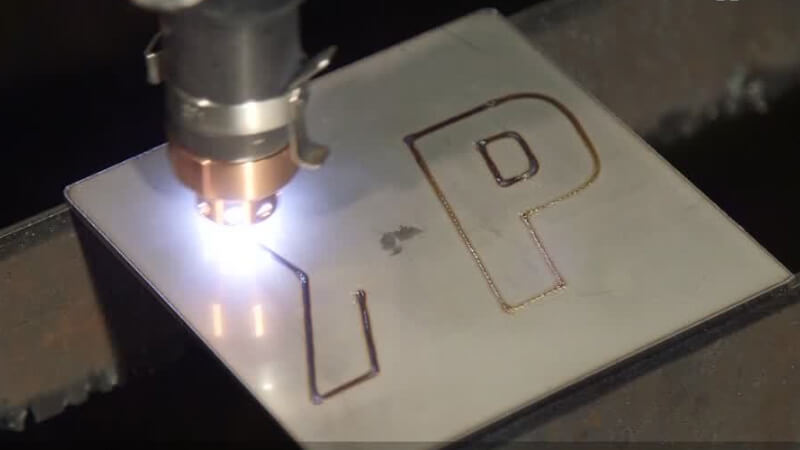
3) Mark creation on the metal surface
Computer controlled motion systems move the torch to guide the plasma jet along the patterns required for the marking graphic. As the plasma torch moves across the metal, different interactions occur depending on the chosen settings.
- Low amperage and high speed: The heat discolors the metal surface, leaving a permanent dark or oxidized mark. This is mainly for visual markings like part numbers, logos, or decorative lines
- Higher amperage and slower speed: The intense heat partially vaporizes the metal, creating shallow grooves or even etched designs. This technique is suitable for detailed markings like barcodes or intricate patterns
- Highest amperage and slowest speed: In extreme cases, the metal can be completely vaporized along the torch path, essentially creating a thin kerf similar to plasma cutting. This is usually for marking lines for subsequent bending or cutting
The pattern marking gets etched to depths ranging from 0.1 mm to 2 mm or more, depending on the plasma current used and marking duration.
Factors affecting plasma marking quality
Plasma marking quality can be affected by several factors, both related to the process itself and the materials involved. Here are some key ones to consider:
Process-related factors
Amperage: Higher amperage increases heat and can create deeper grooves but also increases the risk of heat distortion and dross formation. Lower amperage leads to shallower marks and finer detail but reduces visibility.
Voltage: Higher voltage creates a longer, more focused plasma arc, allowing for greater precision and detail. Lower voltage results in a shorter, wider arc, making it harder to control and leading to less defined marks.
Gas flow: The type and flow rate of the gas used affect the arc stability and heat concentration. Oxygen creates clean cuts but can lead to oxidation and discoloration. Nitrogen produces smoother cuts but may not melt some metals effectively. Argon helps protect the arc from the atmosphere but offers less cleaning power.
Torch speed: Moving the torch too quickly can result in shallow, uneven marks, while going too slowly can cause excessive heat build-up, leading to distortion and dross.
Torch angle: Angling the torch can create bevels or tapered marks but can also affect heat distribution and mark consistency. Maintaining a perpendicular angle ensures the most uniform mark quality.
Standoff distance: The distance between the nozzle and the metal surface influences the size and intensity of the heat affected zone. Keeping a consistent standoff distance is crucial for maintaining mark uniformity.
Duty cycle management: Allowing periods for cooling down the plasma torch improves consistency by avoiding overheating.
Operating environment: Ambient air flow and temperature can influence plasma constriction and cut quality.
The depth and speed
A low torch speed, combined with a shorter standoff distance will produce a thicker and deeper marking. A higher speed in combination with a larger standoff distance will have as a result a thiner and shallower marking. Finding the optimal speed depends on the desired mark depth and material thickness.
What defines how your marking should be? Usually is the purpose of the part you are marking. If the marking should be visible after painting or finishing, it is convenient to be thick and deep. If you do not want the marking to be seen or perceived after the production process, it should be thin and light.
Material-related factors
Metal type: Different metals have varying conductivities and melting points, requiring adjustments in amperage, speed, and gas type to achieve optimal results. Some metals may be more prone to heat distortion or oxidation than others.
Metal condition: Coatings, dust, dirt, oils can negatively impact mark quality. Pre-cleaning the metal surface removes rust, oil, or other contaminants that can interfere with the marking process and compromise mark quality.
Metal hardness: Harder metals take longer to penetrate. Their high melting point can result in weaker graphic contrast. Marking effect may vary across surface hardness variations.
Metal thickness: Thicker materials require higher amperage and slower speeds to create deeper marks, while thinner materials need careful control to avoid burn-through.
Additionally, operator skill and experience play a significant role in achieving consistent and high-quality plasma markings. Understanding the interaction between process parameters and material properties allows operators to adjust settings for optimal results.
The gas
The 2 gases most widely used for plasma marking are air and argon. Your selection might make a difference.
Marking with air will result in a thicker and deeper groove than by using argon. Also, air will leave oxidation and discoloration in the area, while argon produces a more polished mark. But air is considerably cheaper than argon, which is the reason why is still used for many plasma marking operation.
The applications of plasma marking
The applications of plasma marking are surprisingly diverse, extending far beyond simple identification purposes. The versatility of plasma marking lies in its ability to create permanent, detailed, and aesthetically pleasing marks on a wide range of metals. Its efficiency and cost-effectiveness compared to other methods make it a compelling choice for numerous applications across various industries. Here are some key areas where plasma marking shines.
Fabrication and construction
Part identification: Marking serial numbers, logos, or barcodes on manufactured parts for traceability and inventory management. Plasma marking is ideal for control panels, schematic plates, machinery, and component tags as it adheres to surface.
Layout lines: Creating guidelines for welds, bends, or cuts before fabrication, ensuring accuracy and reducing waste.
Architectural and artistic applications: Adding decorative designs, patterns, or text to metal components for aesthetic appeal.
Industrial manufacturing
High-volume marking: Rapidly marking production line parts with logos, batch numbers, or data matrix codes for identification and tracking.
Integration with CNC plasma cutting: Combining cutting and marking functionalities within a single system for automated efficiency.
Dimple creation: Generating precise starting points for drilling holes, improving accuracy and reducing drilling time.
Precision Aerospace Components: Key attributes of lightness, durability, and flexibility without physical distortion are of value.
Automotive Chassis, Engine, and Data Plates: Robust against engine oils, fuels, and daily wear makes metal vehicle labels suitable for long term use.
Other applications
Medical device marking: Creating permanent markings on medical implants or instruments for traceability and safety.
Anti-counterfeiting: Etching unique identifiers on valuable products to deter counterfeiting and safeguard authenticity.
Personalized metalwork: Embellishing knives, jewelry, or other metal objects with customized designs or names.
Artistic collaborations: Integrating plasma markings into sculptures, installations, or mixed-media artwork for unique visual effects.
Let's use the new technologies
Automation is the present and the future
Equipment needed for plasma marking
The equipment needed for plasma marking depends on the desired complexity and the scale of your operation. Here’s a breakdown of the two main options, which are manual (basic) or automated (advanced).
Basic Setup
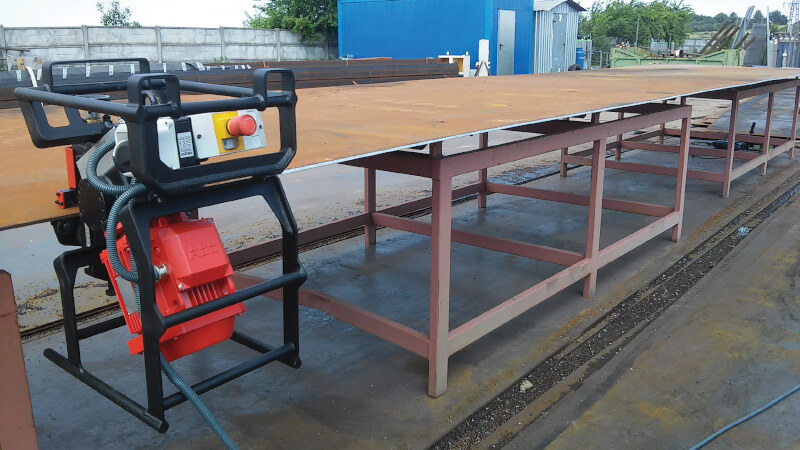
Plasma cutting machine: This is the core component, providing the high-pressure gas and electrical arc to generate the plasma. Most modern plasma cutting machines can be adapted for marking with proper settings and gas adjustments.
Plasma marking torch: The specialized hand torch that constricts the plasma jet emerging from the nozzle to create a small diameter point of contact on the marking surface. Often uses nitrogen, argon gas mixes. Some plasma equipment manufacturers, like Hypertherm, offer cutting consumables specifically for plasma marking.
Marking gas: Choose the appropriate gas depending on the desired outcome. Oxygen and nitrogen are common choices, with Argon offering additional protection from the atmosphere.
Personal protective equipment (PPE): Always wear safety glasses, gloves, and protective clothing to shield yourself from sparks, heat, and fumes.
Optional tools: Clamps or magnets can be helpful to secure the metal being marked. Templates or stencils can aid in achieving precise and repetitive markings.
Advanced Setup
CNC plasma cutting system: For high-volume or intricate marking tasks, integrating a CNC system allows for automated control of the torch movement and precise marking patterns. Using a plasma cutting table can help to handle a high-volume plasma marking operation.
Automated gas control module: This eliminates the need for manual gas switching, ensuring consistent marking quality on different materials.
Nesting software and templates: Dedicated software specifically designed for plasma marking simplifies complex designs and enables automated marking procedures. This generates necessary code and commands to have motion system guide plasma torch. Sets all marking parameters.
Exhaust system: Manages fumes and debris removal from the marking area. Usually equipped with spark traps and filters for cleaner shop air environment.
Cooling Equipment: Keeps torch from overheating by water cooling. Also cools power supply. Improves marking consistency.
We have the plasma marking equipment you need
If you are reading this article, most likely you have or need to start with plasma marking as part of your production process. We know what is needed for you to set up plasma marking in no time. Feel free to contact us to help you to choose the right equipment for you. Our consultants have decades of experience in dealing with plasma marking.